移动应用开发 实验报告13 Content Provider的使用
一、实验目的 熟悉Content Provider的使用; 掌握通讯录、通讯记录数据的获取和展示方法。
|
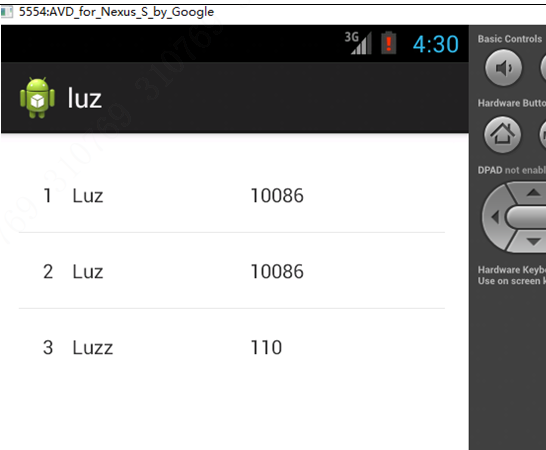
二、实验内容 使用Content Provider读取通讯录通话记录并显示在程序上 |
三、实验原理 ContentProvider是一个抽象类,如果我们需要开发自己的内容提供者我们就需要继承这个类并复写其方法,需要实现的主要方法如下: public boolean onCreate() 在创建ContentProvider时使用 public Cursor query() 用于查询指定uri的数据返回一个Cursor public Uri insert() 用于向指定uri的ContentProvider中添加数据 public int delete() 用于删除指定uri的数据 public int update() 用户更新指定uri的数据 public String getType() 用于返回指定的Uri中的数据MIME类型 数据访问的方法insert,delete和update可能被多个线程同时调用,此时必须是线程安全的
作者:menteelin 链接:https://www.jianshu.com/p/5e13d1fec9c9 来源:简书 著作权归作者所有。商业转载请联系作者获得授权,非商业转载请注明出处。 |
四、实验代码及结果 MainActivity.java package com.example.luz; import java.util.ArrayList; import java.util.HashMap; import java.util.List; import java.util.Map; import android.os.Bundle; import android.provider.CallLog; import android.provider.CallLog.Calls; import android.app.Activity; import android.database.Cursor; import android.view.Menu; import android.widget.ListView; import android.widget.SimpleAdapter; public class MainActivity extends Activity { private ListView callList=null; private Cursor result=null; private List<Map<String,Object>>allCalls=null; private SimpleAdapter simple =null; @Override protected void onCreate(Bundle savedInstanceState) { super.onCreate(savedInstanceState); setContentView(R.layout.activity_main);
this.callList=(ListView) super.findViewById(R.id.callList); this.result=super.getContentResolver().query( CallLog.Calls.CONTENT_URI, null,null, null, null); this.startManagingCursor(this.result); this.allCalls=new ArrayList<Map<String,Object>>(); for(this.result.moveToFirst();!result.isAfterLast();result .moveToNext()){ Map<String,Object> contact=new HashMap<String,Object>(); contact.put("_id", result.getInt(result.getColumnIndex(Calls._ID))); String nameTemp =this.result.getString(this.result.getColumnIndex(CallLog.Calls.CACHED_NAME)); if(nameTemp==null||"".equals(nameTemp)){ nameTemp="未知";
} contact.put("name",nameTemp); contact.put("number", result.getString(result.getColumnIndex(CallLog.Calls.NUMBER))); this.allCalls.add(contact);
} this.simple=new SimpleAdapter(this,this.allCalls,R.layout.calls, new String[]{"_id","name","number"},new int[]{R.id._id, R.id.name,R.id.number}); this.callList.setAdapter(this.simple);
}
private void contactput(String string, String string2) { // TODO Auto-generated method stub
}
@Override public boolean onCreateOptionsMenu(Menu menu) { // Inflate the menu; this adds items to the action bar if it is present. getMenuInflater().inflate(R.menu.main, menu); return true; }
}
Activity_main.xml <LinearLayout xmlns:android="http://schemas.android.com/apk/res/android" xmlns:tools="http://schemas.android.com/tools" android:layout_width="match_parent" android:layout_height="match_parent" android:paddingBottom="@dimen/activity_vertical_margin" android:paddingLeft="@dimen/activity_horizontal_margin" android:paddingRight="@dimen/activity_horizontal_margin" android:paddingTop="@dimen/activity_vertical_margin" tools:context=".MainActivity" android:orientation="vertical" >
<ListView android:id="@+id/callList" android:layout_width="wrap_content" android:layout_height="wrap_content" />
</LinearLayout> AndroidManifest.xml <?xml version="1.0" encoding="utf-8"?> <manifest xmlns:android="http://schemas.android.com/apk/res/android" package="com.example.luz" android:versionCode="1" android:versionName="1.0" >
<uses-sdk android:minSdkVersion="8" android:targetSdkVersion="10" /> <uses-permission android:name="android.permission.READ_CONTACTS"/> <uses-permission android:name="android.permission.WRITER_CONTACTS"/>
<application android:allowBackup="true" android:icon="@drawable/ic_launcher" android:label="@string/app_name" android:theme="@style/AppTheme" > <activity android:name="com.example.luz.MainActivity" android:label="@string/app_name" > <intent-filter> <action android:name="android.intent.action.MAIN" />
<category android:name="android.intent.category.LAUNCHER" /> </intent-filter> </activity> </application>
</manifest>
Calls.xml <TableLayout xmlns:android="http://schemas.android.com/apk/res/android" xmlns:tools="http://schemas.android.com/tools" android:layout_width="fill_parent" android:layout_height="fill_parent" android:paddingBottom="@dimen/activity_vertical_margin" android:paddingLeft="@dimen/activity_horizontal_margin" android:paddingRight="@dimen/activity_horizontal_margin" android:paddingTop="@dimen/activity_vertical_margin" tools:context=".MainActivity" android:orientation="vertical" >
<TableRow> <TextView android:id="@+id/_id" android:textSize="20px" android:layout_width="30px" android:layout_height="wrap_content"/> <TextView android:id="@+id/name" android:textSize="20px" android:layout_width="180px" android:layout_height="wrap_content"/> <TextView android:id="@+id/number" android:textSize="20px" android:layout_width="180px" android:layout_height="wrap_content"/> </TableRow>>
</TableLayout> mainActivity.java <TableLayout xmlns:android="http://schemas.android.com/apk/res/android" xmlns:tools="http://schemas.android.com/tools" android:layout_width="fill_parent" android:layout_height="fill_parent" android:paddingBottom="@dimen/activity_vertical_margin" android:paddingLeft="@dimen/activity_horizontal_margin" android:paddingRight="@dimen/activity_horizontal_margin" android:paddingTop="@dimen/activity_vertical_margin" tools:context=".MainActivity" android:orientation="vertical" >
<TableRow> <TextView android:id="@+id/_id" android:textSize="20px" android:layout_width="30px" android:layout_height="wrap_content"/> <TextView android:id="@+id/name" android:textSize="20px" android:layout_width="180px" android:layout_height="wrap_content"/> <TextView android:id="@+id/number" android:textSize="20px" android:layout_width="180px" android:layout_height="wrap_content"/> </TableRow>>
</TableLayout>
|
五、试验分析(思考)
其它应用可以通过ContentResolver来访问ContentProvider提供的数据,而ContentResolver通过uri来定位自己要访问的数据,所以我们要先了解uri。URI(Universal Resource Identifier)统一资源定位符,如果您使用过安卓的隐式启动就会发现,在隐式启动的过程中我们也是通过uri来定位我们需要打开的Activity并且可以在uri中传递参数。
|